ImageGenCam
A DIY Pi Zero 2 W camera with image generation.
By OpenAI
- Posted
- GitHub stars
- 488 (GitHub)
What you need
- Difficulty
- Intermediate · Our suggestion
- License
- Apache-2.0 (source)
Parts
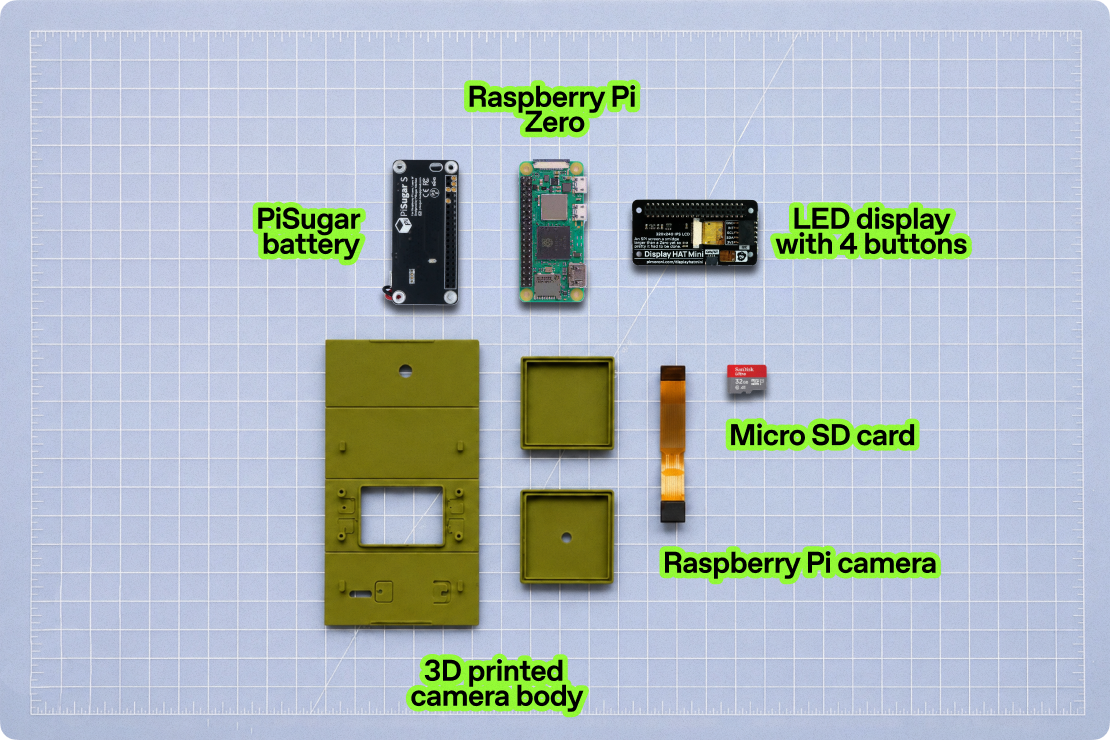
- Raspberry Pi Zero 2 W with headers (board)
- Pimoroni Display HAT Mini (PIM589), Spy Camera for Raspberry Pi Zero (Adafruit 3508 or equivalent), PiSugar 3, 16 GB microSD card and reader, 3D-printed camera case (STL and STEP in the repo), Mac with Codex Desktop
- AI model or service
- ChatGPT Images 2.0 (OpenAI account), Codex Desktop guides the build
Overview
ImageGenCam is OpenAI's digital camera you build yourself with Codex. It pairs a Raspberry Pi Zero 2 W with a Pimoroni Display HAT Mini, a spy camera and a PiSugar 3 in a 3D-printed case. Pick a prompt, take a photo, and ChatGPT Images 2.0 transforms it; built-in prompts include Pathetic Scribble, Turn to Cheese, Goblin Mode and Anime Portrait. A companion web app on your phone downloads photos and updates prompts. Codex Desktop on a Mac guides the build. Apache-2.0.
How it works
Open Codex Desktop and type “Help me make ImageGenCam https://github.com/openai/imagegencam”; Codex reads the repo and walks you through the build. When you press the shutter the viewfinder freezes for a moment, then generation runs in the background so you can keep shooting, and the album icon sparkles when an image is ready. A Magic Button is left for you to program with Codex. The phone app must be on the same Wi-Fi as the camera; the README recommends switching the camera to your phone's hotspot to use it away from home.
Why it's interesting
ImageGenCam is a digital camera you build yourself with Codex: a Raspberry Pi Zero 2 W, a Pimoroni Display HAT Mini, a spy camera and a PiSugar 3 in a 3D-printed shell. It works a lot like a very small, very weird point-and-shoot: pick a prompt, snap a photo, and ChatGPT Images 2.0 transforms the image, while generation keeps running in the background so you can keep shooting. Built-in prompts include Pathetic Scribble, Turn to Cheese, Goblin Mode and Anime Portrait, and the companion web app on your phone opens the prompt editor. It is designed as a weekend build, though people already familiar with Codex, Raspberry Pi and 3D printing may get it running in under an hour. You start by typing one line into Codex Desktop on a Mac, and Codex reads the repo and walks you through the build. The Magic Button is left for you to program, and the README recommends PETG for the folding case, an online printing service if you have no printer, and your phone's mobile hotspot for use away from home.
Source: github.com/openai/imagegencam/blob/3475b97a2b631d7735d97f34d58dea47deb17942/README.md
Hardware
- Raspberry Pi Zero 2 W with headers
- Pimoroni Display HAT Mini (PIM589)
- Spy Camera for Raspberry Pi Zero (Adafruit 3508 or equivalent)
- PiSugar 3
- 16 GB microSD card and reader
- 3D-printed camera case (STL and STEP in the repo)
- Mac with Codex Desktop
Like this build? Get the weekly builds
Every Thursday: the 5 best gadget hacks you can copy. Free.
Built something? Submit a build
Credits and links
- OpenAI: Creator
- WquGuru (@wquguru): Featured it in a roundup of OpenAI's hardware gallery
- License: Apache-2.0 (source)
This page is a short summary written by HardwareLab. Build steps, code and photos belong to the creator; follow “View original” for the full project.
Featured? Add this badge
Built this? Paste the badge into your README. It links back to this page.

Markdown
[](https://hardwarelab.dev/projects/imagegencam/?utm_source=badge&utm_medium=referral&utm_campaign=launch_2w)HTML
<a href="https://hardwarelab.dev/projects/imagegencam/?utm_source=badge&utm_medium=referral&utm_campaign=launch_2w"><img src="https://hardwarelab.dev/badge.svg" alt="Featured on HardwareLab" width="188" height="20"></a>Related builds
All 12 in Vision & Cameras
Raspberry Pi 5 Hailo 8 Pothole Detection System
Detects, classifies and sizes potholes from a Pi 5.
- Raspberry Pi 5
- Hailo-8
- camera
Advanced144
AI Raspberry Pi cat detection
Get an email when your cat does something it shouldn't.
- Raspberry Pi
- camera
Beginner197
RICOH GR Live View Shooting
Hot-shoe remote on a StickS3.
- M5Stack StickS3 (ESP32-S3, 8 MB flash, 8 MB PSRAM)
- RICOH GR II, GR III/IIIx or GR IV
- 3D-printed hot-shoe adapter (STL and STEP in the repo)
- +1 more
Beginner · Our suggestion45
Maple Syrup Pi Camera
A low-power 3D-printed smart camera with a Coral TPU.
- Raspberry Pi Zero W
- Coral EdgeTPU
- camera
Intermediate75